
The Z80 can only handle 64K at a time. To overcome this, the MSX architecture uses Slots, dividing the address space into four 16K pages. Although this already existed in the MSX1, it was with the MSX2 and the introduction of the Memory Mapper that up to 4MB of RAM could be managed. This mapper is controlled through the input/output ports 0xFC–0xFF. Since each manufacturer placed RAM in different slots (for example, the Philips VG-8235 has it in slot 3-2, while a Sony HB-F1XDJ has it in 3-0), and if the system also included an additional memory mapper to expand RAM, management became complex. For this reason, MSX-DOS2 introduced a standardized memory manager that allowed programmers to use RAM without worrying about the physical architecture of each model.
In this article, we will explore this management and how to use it in our programs. In the article RAM Pagination, we already covered this topic and explained the DOS2 functions in Fusion-C; here we will look at their equivalents in MSXgl.
Additionally, since we have deepened our understanding of the sdcc environment, we will examine how to link different modules in a more efficient way. In the previous article, development was handled as a separate module and later integrated. This strategy also works for MSXgl, but here we will present a new one (equally complex but more efficient) that can also be applied to Fusion-C.
bool DOS_Mapper_Init()u8 DOSMapper_GetPage(u8 page)page.u8 DOSMapper_GetPage0()DOSMapper_GetPage1, DOSMapper_GetPage2, and DOSMapper_GetPage3.bool DOSMapper_Alloc(u8 type, u8 slot, DOS_Segment* seg)type can be either DOS_ALLOC_USER, where allocated memory is released when the program ends, or DOS_ALLOC_SYS, where the memory remains reserved after the program finishes. The latter is useful for RAM disks or driver memory. The slot indicates the page/slot where it will be mapped: 0, 1, 2, or 3. In DOS2, it is recommended to use pages 1 and 2, since the lower part of page 0 and the upper part of page 3 contain system variables. Care must be taken when manipulating them to avoid crashing the system.We have created a small example to work with paging in DOS2. The first part switches segments in page/slot 1 (address 0x4000) and writes different values into the memory map. The second part calls functions created in other files that have been loaded into page 1. The main program code is located in the file paginate.c, and the two called functions are in the files funcio1.c and funcio2.c.
We will also use the Debug library, which allows us to write messages to the PC console through openMSX by enabling the device -ext debugdevice. This will also help us observe what the MSX is doing.
  1#include "dos_mapper.h"
  2#include "dos.h"
  3#include "print.h"
  4#include "input.h"
  5#include "vdp.h"
  6#include "bios.h"
  7#include "debug.h"
  8
  9#include "font/font_mgl_std3.h"
 10
 11#include "funcions.h"
 12
 13__at(0x4000) u8 array[0x4000];
 14__at(0x8000) u8 res_func1;
 15__at(0x8001) u8 res_func2;
 16
 17u8 startingSeg;
 18u8 newSeg;
 19u8 newSeg2;
 20DOS_Segment g_newSeg;
 21DOS_Segment g_newSeg2;
 22DOS_Segment g_func1;
 23DOS_Segment g_func2;
 24u8 g_StrBuffer[128];
 25DOS_FCB g_File;
We start by including the libraries we will use:
Now let's move on to the variables. First, array, which is 16K in size and reserves memory so that the linker does not place any other functions or variables in page 1, where we will load different blocks of code from the external functions. Although, we have to take into account, as Aoineko has pointed, that the SDCC documentation explicitly states that if you manually place content using the __at directive, there is no guarantee that this space will not be overwritten by content accumulated by the compiler. So, if our program crashes, this could be one of the causes. The two variables res_func1 and res_func2 store the return values of the external functions we call. Then we store the initial page number in newSeg along with the result of assigning the two new pages. Next, we have the DOS_Segment structures that store information about the assigned segments. Finally, we define the variables for reading from disk: the read buffer g_StrBuffer and the DOS file structure g_File.
 27void FT_SetName(DOS_FCB *p_fcb, const char *p_name) {
 28  char i, j;
 29  Mem_Set(0, p_fcb, sizeof(DOS_FCB));
 30  for (i = 0; i < 11; i++) {
 31    p_fcb->Name[i] = ' ';
 32  }
 33  for (i = 0; (i < 8) && (p_name[i] != 0) && (p_name[i] != '.'); i++) {
 34    p_fcb->Name[i] = p_name[i];
 35  }
 36  if (p_name[i] == '.') {
 37    i++;
 38    for (j = 0; (j < 3) && (p_name[i + j] != 0) && (p_name[i + j] != '.');
 39         j++) {
 40      p_fcb->Name[8 + j] = p_name[i + j];
 41    }
 42  }
 43}
This is a function we have used many times, responsible for assigning the filename to the DOS_FCB file reading structure so that the bytes of the specified file can be read.
 45void main(){
 46  VDP_SetMode(VDP_MODE_TEXT2);
 47
 48  VDP_SetColor(0xF0);
 49	VDP_FillVRAM_16K(0, 0x0000, 0x4000); // Clear VRAM
 50
 51	Print_SetTextFont(g_Font_MGL_Std3, 1);
 52	Print_SetColor(0xF, 0x0);
 53
 54  DOSMapper_Init();
 55  DEBUG_INIT();
Initialization of the screen by selecting the display mode and clearing VRAM. We also initialize the chosen font typography, as well as the memory mapper and the debug system.
 57	Print_SetPosition(0, 0);
 58	Print_DrawText("We write value 1 to the starting segment");
 59  for (u16 j=0; j<0x3fff; j++) {
 60    array[j] = 1;
 61  }
 62  Print_DrawText("\nValue written.\n");
 63
 64	Print_DrawCharX('-', g_PrintData.ScreenWidth);
 65  Print_DrawText("\nNow we add a new segment and we put it on page 1");
 66  startingSeg = DOSMapper_GetPage(1);
 67  DEBUG_LOGNUM("startingSeg number, value returned by alloc: ", startingSeg);
 68
 69  newSeg = DOSMapper_Alloc(DOS_ALLOC_USER, DOS_SEGSLOT_PRIM, &g_newSeg);
 70  DEBUG_LOGNUM("newSeg number, value returned by alloc: ", newSeg);
 71  DEBUG_LOGNUM("g_newSeg number", g_newSeg.Number);
 72
 73  DOSMapper_SetPage(1, g_newSeg.Number);
 74  Print_DrawText("\nSegment changed. Now we write value 2");
 75  for (u16 j=0; j<0x3FFf; j++) {
 76    array[j] = 2;
 77  }
 78  Print_DrawText("\nDone.\n");
 79  DEBUG_LOG("Written value 2 to segment g_newSeg 2");
 80
 81	Print_DrawCharX('-', g_PrintData.ScreenWidth);
 82  Print_DrawText("\nNow we add a new segment and we put it again on page 1");
 83  newSeg2 = DOSMapper_Alloc(DOS_ALLOC_USER, DOS_SEGSLOT_PRIM, &g_newSeg2);
 84  DEBUG_LOGNUM("newSeg2 value returned by alloc", newSeg2);
 85  newSeg = DOSMapper_GetPage1();
 86  DEBUG_LOGNUM("newSeg value returned by getPage", newSeg);
 87  DOSMapper_SetPage(1, g_newSeg2.Number);
 88  DEBUG_LOG("set in page 1 g_newSeg2");
 89  Print_DrawText("\nSegment changed. Now we write value 3");
 90  for (u16 j=0; j<0x3FFf; j++) {
 91    array[j] = 3;
 92  }
 93  Print_DrawText("\nDone");
Line 57 positions the cursor to display the messages we will output. After explaining on screen what we are going to do, we create a loop where we assign the value 1 to all positions in the 16K block. On line 66, we retrieve the segment number that was active when the application was initialized. On line 69, we allocate 16K of user memory and store it in the g_newSeg structure; the returned value, if successful, is 0xFF, which we store in newSeg. On line 73, we map this new segment to page 1 and fill it with the value 2. In lines 81–93, we do the same for the g_newSeg2 segment, but this time we store the value 3 in the new segment. We have been assigning values to the segments using the array variable, which we mentioned is located at address 0x4000 and has a size of 16K (0x4000 bytes), corresponding to the entire page 1 of the Z80. In this way, the processor assumes it is always filling page 1, but in reality, we are swapping that page with different segments mapped to different physical addresses.
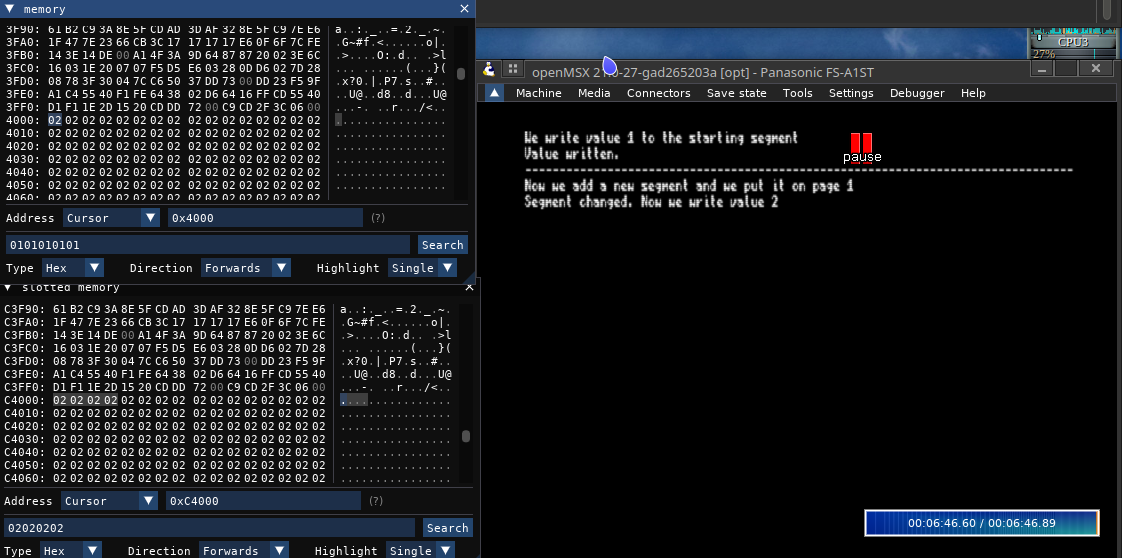
At this point, if we go to the Debugger menu in openMSX and select Add hex editor, then slotted memory, we will see the entire computer memory. By navigating through it, it becomes easy to spot the blocks filled with values 1, 2, or 3. In my case, these started at addresses 0x8000, 0x14000, and 0xC4000.
In the image below, you can see a moment from the simulation where the memory values in page 1 and in the overall memory are displayed:
 96  DOSMapper_SetPage(1, g_newSeg.Number);
 97  Print_DrawText("Changed segment g_newSeg , read value: ");
 98  Print_DrawInt(array[3]);
 99  DEBUG_LOGNUM("Changed segment g_newSeg: ", array[3]);
Now we go through the steps in reverse, restoring the segments we previously saved in order to read their values once they are mapped back into page 1. We print the results both on screen using Print_DrawInt and to the console using DEBUG_LOGNUM.
101  DOSMapper_Alloc(DOS_ALLOC_USER, DOS_SEGSLOT_PRIM, &g_func1);
102  DOSMapper_Alloc(DOS_ALLOC_USER, DOS_SEGSLOT_PRIM, &g_func2);
103
104  DOSMapper_SetPage(1, g_func1.Number);
105
106  Print_DrawText("\n");
107  Print_DrawCharX('-', g_PrintData.ScreenWidth);
108  Print_DrawText("\nReading file funcio1.bin. ");
109  DEBUG_LOG("Reading file funcio1.bin");
110  FT_SetName(&g_File, "funcio1.bin");
111  DOS_OpenFCB(&g_File);
112  for (u16 i=0; i<g_File.Size; i+=128) {
113    DOS_SetTransferAddr(&array[i]);
114    DOS_SequentialReadFCB(&g_File);
115  }
116  res_func1 = 4;
117  DEBUG_LOGNUM("Value before func1: ", res_func1);
118  Print_DrawText("\nBefore func1: ");
119  Print_DrawInt(res_func1);
120  res_func1 = funcio1();
121  DEBUG_LOGNUM("Value after calling func1: ", res_func1);
122  Print_DrawText("\nAfter func1: ");
123  Print_DrawInt(res_func1);
124
125  Print_DrawText("\nReading file funcio2.bin. ");
126  DEBUG_LOG("Reading file funcio2.bin");
127  DOSMapper_SetPage(2, g_func2.Number);
128  FT_SetName(&g_File, "funcio2.bin");
129  DOS_OpenFCB(&g_File);
130  for (u16 i=0; i<g_File.Size; i+=128) {
131    DOS_SetTransferAddr(&array[i]); // Els he de guardar a array, llegir directament a allà
132    DOS_SequentialReadFCB(&g_File);
133  }
134
135  res_func2 = 16;
136  DEBUG_LOGNUM("\nBefore func2: ", res_func2);
137  Print_DrawText("Before func2: ");
138  Print_DrawInt(res_func2);
139  res_func2 = funcio2();
140  DEBUG_LOGNUM("After func2: ", res_func2);
141  Print_DrawText("\nAfter func2: ");
142  Print_DrawInt(res_func2);
143
144  Print_DrawText("\nWe have run the two function in different pages");
145  Print_DrawText("\nYou can debug the memory page in openmsx debugger");
146
147  Print_DrawText("\nPress space to go back to DOS");
148  while (!Keyboard_IsKeyPressed(KEY_SPACE));
149
150  Bios_Exit(0);
151}
We have now completed the first part of the test, where we switch memory banks. In the second part, we do the same, but this time we will store a function in each new segment. Remember that these modules containing additional functions cannot exceed 16K.
We begin by allocating these segments on lines 101 and 102, and then mapping the first one into page 1. We display various information on screen and in the log to track the experiment’s state. We load the binary of the function funcio1, located in the file funcio1.bin, into the newly assigned segment g_func1 between lines 110 and 115. We assign the value 4 to the variable res_func1, read and display this value, call the function funcio1, and then read and display the value of res_func1 again.
Between lines 125 and 145, we repeat the same process, but this time for the function funcio2.
Finally, we just need to display a message prompting the user to press the space bar and wait for that input to finish.
1#pragma codeseg funcio1 2 3extern void DEBUG_LOG(const char* msg); 4 5unsigned char funcio1(){ 6 DEBUG_LOG("funcio1 has been called"); 7 return 0x5; 8}1#pragma codeseg funcio2 2 3extern void DEBUG_LOG(const char* msg); 4 5unsigned char funcio2(){ 6 DEBUG_LOG("funcio2 has been called"); 7 return 0xde; 8}
Here we have the two functions that do the same thing—return a value—but each returns a different value. Both use the DEBUG_LOG function, which resides in the initial 16K of the main program (in this case, paginate.c), and it is the linker that will determine its address when combining all binaries.
Unlike the previous article, RAM Pagination, here we do not reload the DEBUG_LOG function since it is already in the memory of the main function. This keeps the modules smaller but increases the complexity of proper linking.
The compiler directive #pragma codeseg funcio1 tells the compiler that all this code should go to a specific memory address. Thus, when it creates the .map files and translates the code into binary, it will use the specified address at compile time, provided we pass the parameter --code-loc 0x4000 to sdcc.
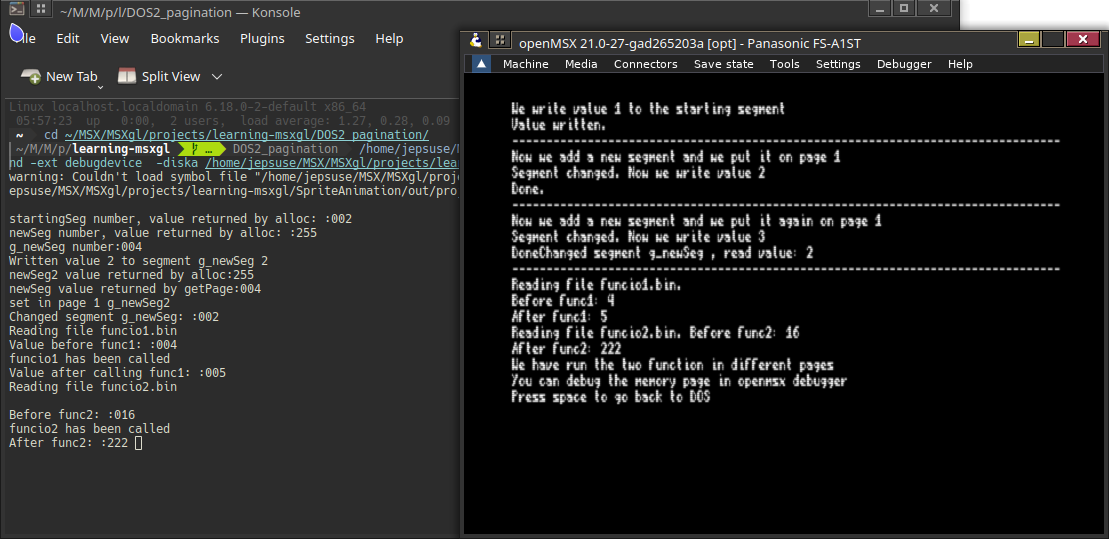
In the image below, you can see the execution of the script both on the emulated MSX screen and in the console output. We can observe the different steps and how the read values match the expected values according to the page changes that were made.
To obtain the binaries of the 16K functions correctly mapped relative to the main program, the following steps must be followed:
~/MSXgl/tools/sdcc/bin/sdcc -c -mz80 -DTARGET=TARGET_DOS2 -DMSX_VERSION=MSX_TR
-I~/MSXgl/projects/learning-msxgl/DOS2_pagination/
-I~/MSXgl/engine/src
-I~/MSXgl/engine/content
-I~/MSXgl/tools/
--opt-code-speed --debug -DAPPSIGN ./paginate.c
-o ~/MSXgl/projects/learning-msxgl/DOS2_pagination/out/
We use the same command as for compiling the main module file in MSXgl. In this step, the compiler creates labels so the linker can place functions into memory, generating the .rel file. This file contains machine code, symbol definitions, external references, and can be relocated in memory (the .rel extension comes from "relocate").
~/MSXgl/tools/sdcc/bin/sdcc -mz80 -c --codeseg funcio1 funcio1.c -o funcio1.rel
~/MSXgl/tools/sdcc/bin/sdcc -mz80 -c --codeseg funcio2 funcio2.c -o funcio2.rel
We use the --codeseg parameter to create a memory segment named funcio1, which can later be linked to the desired location using the SDCC linker parameter -Wl-g_funcio1.
~/MSXgl/tools/sdcc/bin/sdcc -mz80 --vc --no-std-crt0 -L~/MSXgl/tools/sdcc/lib/z80
--code-loc 0x0100 --data-loc 0x0000  --opt-code-speed --debug
~/MSXgl/projects/learning-msxgl/DOS2_pagination/out/crt0_dos.rel
~/MSXgl/projects/learning-msxgl/DOS2_pagination/out/msxgl.lib
~/MSXgl/projects/learning-msxgl/DOS2_pagination/out/paginate.rel
-o ~/MSXgl/projects/learning-msxgl/DOS2_pagination/out/paginate.ihx
funcio1.rel funcio2.rel
Once we have the .rel files, the SDCC linker is used to place them definitively in memory and resolve all symbols and references. This is why we also pass the previously compiled binaries funcio1.rel and funcio2.rel, which are called by paginate.c.
DEBUG_LOG address and provide it to the linker
~/MSXgl/tools/sdcc/bin/sdcc -mz80 --no-std-crt0 --code-loc 0x4000 funcio1.rel -o funcio1.ihx -Wl-g_DEBUG_LOG=0x1a87 -L~/MSXgl/tools/sdcc/lib/z80;

~/MSX/MSXgl/tools/sdcc/bin/sdcc -mz80 --no-std-crt0 --code-loc 0x4000 funcio2.rel -o funcio2.ihx -Wl-g_DEBUG_LOG=0x1a87 -L~/MSXgl/tools/sdcc/lib/z80;
Now we need to find the address of DEBUG_LOG in the main program paginate.c to tell the 16K modules where to jump when calling this function. Once located in paginate.map, we instruct the linker to use it with the -Wl-g parameter, specifying the function name in the map file (in this case _DEBUG_LOG) and the obtained address.
~/MSXgl/tools/MSXtk/bin/MSXhex ~/MSXgl/projects/learning-msxgl/DOS2_pagination/out/paginate.ihx -e com -s 0x0100 -l 0;

~/MSXgl/tools/MSXtk/bin/MSXhex ~/MSXgl/projects/learning-msxgl/DOS2_pagination/funcio1.ihx -e bin;

~/MSXgl/tools/MSXtk/bin/MSXhex ~/MSXgl/projects/learning-msxgl/DOS2_pagination/funcio2.ihx -e bin;
To convert the binaries to MSX format, we use the MSXgl tool MSXhex. Note that we call it differently for the main program than for the functions, since the main program must follow the .com format for MSXDOS2, whereas the binaries are just the translation.
cp funcio1.bin emul/dos2/;
cp funcio2.bin emul/dos2/;
cp out/paginate.com emul/dos2/;
~/openMSX/derived/openmsx
-machine Panasonic_FS-A1ST -ext moonsound -ext debugdevice
-ext msxdos2 -diska ~/MSXgl/projects/learning-msxgl/DOS2_pagination/emul/dos2
This will launch the emulator, allowing you to see the results of our simulations as shown in the image above.
MSXgl already supports projects larger than 64K, but they must be for ROM and it helps you compile them. However, we can create a JavaScript script that MSXgl can use.
The file build.sh in our project directory calls node, the command from the Node.js project that allows JavaScript to run outside the browser. The script executed is the one specified in build.sh, in this case .../engine/script/js/build.js, which orchestrates the entire compilation process. The first file it looks for is ./project_config.js, and if not found, it checks .../projects/default_config.js, and if still not found, .../engine/script/js/default_config.js. All these files share the same structure and define the different steps to compile the project. Additionally, if it exists, it also loads [project_name].js for project-specific configurations.
The project_config.js file allows loading scripts before the main compilation and scripts after it. This feature will be used to compile our drivers before the main compilation and later, in the post-build step, to locate the functions from the main block used in the modules. To achieve this, you only need to fill the PreBuildScripts and PostBuildScripts variables with the commands to execute. In our case, we created a JavaScript script, build_pagination.js, that handles this. The resulting code setup would be:
231//-- Command lines to be executed before the build process (array)
232PreBuildScripts = [	"node build_pagination.js pre" ];
233
234//-- Command lines to be executed after the build process (array)
235PostBuildScripts = [ "node build_pagination.js post" ];
Once we have the steps clear, let's see how we can put them into a JavaScript script to continue using the language employed in MSXgl. This implementation can be found in the file build_pagination.js.
  1#!/usr/bin/env node
  2// ____________________________
  3// ██▀▀█▀▀██▀▀▀▀▀▀▀█▀▀█        │   ▄▄▄                ▄▄
  4// ██  ▀  █▄  ▀██▄ ▀ ▄█ ▄▀▀ █  │  ▀█▄  ▄▀██ ▄█▄█ ██▀▄ ██  ▄███
  5// █  █ █  ▀▀  ▄█  █  █ ▀▄█ █▄ │  ▄▄█▀ ▀▄██ ██ █ ██▀  ▀█▄ ▀█▄▄
  6// ▀▀▀▀▀▀▀▀▀▀▀▀▀▀▀▀▀▀▀▀────────┘
  7// DOS2 Pagination Build Handler - Pre & Post Build Steps
  8
  9const fs = require('fs');
 10const path = require('path');
 11const { execSync } = require('child_process');
 12
 13const PROJECT_DIR = __dirname;
 14const OUT_DIR = path.join(PROJECT_DIR, 'out');
 15const EMUL_DIR = path.join(PROJECT_DIR, 'emul', 'dos2');
 16
 17// Load PaginatedFunctions from project_config.js
 18let PaginatedFunctions = [];
 19try {
 20    // Create a context object to capture the PaginatedFunctions variable
 21    const configCode = fs.readFileSync(path.join(PROJECT_DIR, 'project_config.js'), 'utf-8');
 22    const configModule = {};
 23    // Execute the config file in a controlled context
 24    const vm = require('vm');
 25    const context = vm.createContext({ PaginatedFunctions: [] });
 26    vm.runInContext(configCode, context);
 27    PaginatedFunctions = context.PaginatedFunctions;
 28
 29    if (!PaginatedFunctions || PaginatedFunctions.length === 0) {
 30        console.error('PaginatedFunctions not found or empty in project_config.js');
 31        process.exit(1);
 32    }
 33} catch (err) {
 34    console.error(`Error loading PaginatedFunctions from project_config.js: ${err.message}`);
 35    process.exit(1);
 36}
 37
 38const SDCC_PATH = '/home/jepsuse/MSX/MSXgl/tools/sdcc/bin';
 39const MSXHEX = '/home/jepsuse/MSX/MSXgl/tools/MSXtk/bin/MSXhex';
 40
 41const colors = {
 42    reset: '\x1b[0m',
 43    green: '\x1b[32m',
 44    yellow: '\x1b[33m',
 45    red: '\x1b[31m',
 46    blue: '\x1b[36m'
 47};
 48
 49function log(msg, color = 'reset') {
 50    console.log(`${colors[color]}${msg}${colors.reset}`);
 51}
 52
 53function exec(command, description) {
 54    log(`  ${description}...`, 'yellow');
 55    try {
 56        execSync(command, {
 57            cwd: PROJECT_DIR,
 58            stdio: 'pipe'
 59        });
 60        log(`  ✓ Done`, 'green');
 61    } catch (error) {
 62        log(`  ✗ Failed: ${error.message}`, 'red');
 63        throw error;
 64    }
 65}
We start by defining variables that will be used throughout the compilation process. Notably, the PaginatedFunctions variable will hold the names of the files we want to compile as functions to be called later. This value is extracted from the variable with the same name, PaginatedFunctions, in the project_config.js file.
 69function preBuild() {
 70    log('\n╔════════════════════════════════════════════════╗', 'blue');
 71    log('║   DOS2 Pagination - PRE-BUILD                  ║', 'blue');
 72    log('║   Step 1: Compile paginated functions          ║', 'blue');
 73    log('╚════════════════════════════════════════════════╝\n', 'blue');
 74
 75    if (!PaginatedFunctions || PaginatedFunctions.length === 0) {
 76        log('No paginated functions configured. Skipping pagination pre-build.\n', 'yellow');
 77        return;
 78    }
 79
 80    log('Compiling paginated functions:', 'yellow');
 81
 82    // Create out directory if it doesn't exist
 83    if (!fs.existsSync(OUT_DIR)) {
 84        fs.mkdirSync(OUT_DIR, { recursive: true });
 85    }
 86
 87    for (const func of PaginatedFunctions) {
 88        const file = `${func.name}.c`;
 89        if (!fs.existsSync(path.join(PROJECT_DIR, file))) {
 90            log(`  ✗ ${file} not found`, 'red');
 91            continue;
 92        }
 93        const cmd = `"${SDCC_PATH}/sdcc" -mz80 -c "${file}" -o "${OUT_DIR}/${func.name}.rel"`;
 94        exec(cmd, `  ${func.name}.c → out/${func.name}.rel`);
 95    }
 96
 97    log('\n✓ Pre-build complete. Main build will now process paginated functions.\n', 'green');
 98}
This is the first function executed before the standard MSXgl compilation and is responsible for creating the binaries of the maximum 16K files that we will use in our program.
100/**
101 * Extract extern function declarations from a C source file and its includes.
102 * Looks for patterns like: extern void FUNCTION_NAME(...);
103 */
104function extractExternFunctions(filePath) {
105    const externFuncs = [];
106    const processedFiles = new Set();
107
108    function processFile(currentPath) {
109        // Avoid processing the same file twice
110        if (processedFiles.has(currentPath)) {
111            return;
112        }
113        processedFiles.add(currentPath);
114
115        if (!fs.existsSync(currentPath)) {
116            return;
117        }
118
119        const content = fs.readFileSync(currentPath, 'utf-8');
120
121        // Extract extern declarations: extern <return_type> FUNCTION_NAME(...)
122        const externRegex = /extern\s+\w+[\s\*]+(\w+)\s*\(/g;
123        let match;
124
125        while ((match = externRegex.exec(content)) !== null) {
126            const funcName = match[1];
127            if (!externFuncs.includes(funcName)) {
128                externFuncs.push(funcName);
129            }
130        }
131
132        // Extract #include directives and process them
133        const includeRegex = /#include\s+["<]([^"<>]+)[">]/g;
134        while ((match = includeRegex.exec(content)) !== null) {
135            const includePath = match[1];
136            // Try to find the included file in the project directory
137            const fullPath = path.join(PROJECT_DIR, includePath);
138            processFile(fullPath);
139        }
140    }
141
142    processFile(filePath);
143    return externFuncs;
144}
145
146/**
147 * Find symbol address in MAP file by function name.
148 * Looks for patterns like:
149 *   00001AA5  _DEBUG_LOG                         debug
150 */
151function findSymbolInMap(mapFile, funcName) {
152    const content = fs.readFileSync(mapFile, 'utf-8');
153    const lines = content.split('\n');
154
155    // Look for the symbol with underscore prefix: _FUNCNAME
156    const symbolName = '_' + funcName;
157
158    for (const line of lines) {
159        // Match: ADDRESS  _SYMBOL_NAME  module
160        const match = line.match(/^\s*([0-9A-Fa-f]+)\s+_[\w]+\s+/);
161        if (match && line.includes(symbolName)) {
162            const addr = '0x' + match[1];
163            return addr;
164        }
165    }
166
167    return null;
168}
169
170function postBuild() {
171    log('\n╔════════════════════════════════════════════════╗', 'blue');
172    log('║   DOS2 Pagination - POST-BUILD                 ║', 'blue');
173    log('║   Step 2: Relink & convert paginated functions ║', 'blue');
174    log('╚════════════════════════════════════════════════╝\n', 'blue');
175
176    if (!PaginatedFunctions || PaginatedFunctions.length === 0) {
177        log('No paginated functions configured. Skipping pagination post-build.\n', 'yellow');
178        return;
179    }
180
181    // Step 2a: Verify MAP file exists
182    log('Step 2a: Checking for main program MAP file...', 'yellow');
183    const mapFile = path.join(OUT_DIR, 'paginate.map');
184
185    if (!fs.existsSync(mapFile)) {
186        log(`  ✗ MAP file not found at ${mapFile}`, 'red');
187        log('     The main program must be linked first to generate the MAP file.\n', 'red');
188        return;
189    }
190    log('  ✓ MAP file found\n', 'green');
191
192    // Step 2b: Relink each paginated function at specified address with required symbols
193    log('Step 2b: Relinking paginated functions at specified addresses...', 'yellow');
194
195    for (const func of PaginatedFunctions) {
196        const name = func.name;
197        const pageAddr = typeof func.page === 'string' ? parseInt(func.page, 16) : func.page;
198        const codeLoc = `0x${pageAddr.toString(16).toUpperCase()}`;
199        const relFile = path.join(OUT_DIR, `${name}.rel`);
200
201        if (!fs.existsSync(relFile)) {
202            log(`  ✗ ${relFile} not found`, 'red');
203            continue;
204        }
205
206        // Extract extern function declarations from this source file
207        const sourceFile = path.join(PROJECT_DIR, `${name}.c`);
208        const externFuncs = extractExternFunctions(sourceFile);
209
210        if (externFuncs.length === 0) {
211            log(`  Relinking ${name} at ${codeLoc} (no external dependencies)...`, 'yellow');
212        } else {
213            log(`  Relinking ${name} at ${codeLoc} with ${externFuncs.length} external function(s):`, 'yellow');
214        }
215
216        // Find each extern function's address in the MAP file
217        let linkerFlags = '';
218        for (const funcName of externFuncs) {
219            const addr = findSymbolInMap(mapFile, funcName);
220            if (addr) {
221                linkerFlags += ` -Wl-g_${funcName}=${addr}`;
222                log(`    ${funcName} = ${addr}`, 'green');
223            } else {
224                log(`    ✗ ${funcName} NOT FOUND in MAP file!`, 'red');
225            }
226        }
227
228        const cmd = `"${SDCC_PATH}/sdcc" -mz80 --no-std-crt0 --code-loc ${codeLoc} ` +
229            `"${relFile}"${linkerFlags} ` +
230            `-L"${SDCC_PATH}/../lib/z80" -o "${OUT_DIR}/${name}.ihx"`;
231
232        exec(cmd, `  Relinking ${name} at ${codeLoc}`);
233    }
234
235    // Step 2c: Convert IHX to binary format
236    log('\nStep 2c: Converting IHX files to binary format...', 'yellow');
237
238    for (const func of PaginatedFunctions) {
239        const name = func.name;
240        const ihxFile = path.join(OUT_DIR, `${name}.ihx`);
241
242        if (fs.existsSync(ihxFile)) {
243            const cmd = `"${MSXHEX}" "${ihxFile}"`;
244            exec(cmd, `  Converting ${name}.ihx → ${name}.bin`);
245        }
246    }
247
248    // Step 2d: Copy files to emulator directory
249    log('\nStep 2d: Copying binaries to emulator directory...', 'yellow');
250
251    if (!fs.existsSync(EMUL_DIR)) {
252        fs.mkdirSync(EMUL_DIR, { recursive: true });
253    }
254
255    for (const func of PaginatedFunctions) {
256        const name = func.name;
257        const binFile = path.join(OUT_DIR, `${name}.bin`);
258
259        if (fs.existsSync(binFile)) {
260            fs.copyFileSync(binFile, path.join(EMUL_DIR, `${name}.bin`));
261            log(`  ✓ Copied ${name}.bin`, 'green');
262        }
263    }
264
265    log('\n✓ Post-build complete!\n', 'green');
266}
267
This is the part to execute once the standard MSXgl compilation has finished. The first function, extractExternFunctions, searches for the names of functions defined in the C file as extern. These names are then located in the map file by the findSybolInMap function to determine the memory address assigned by the linker. These two functions are used in the postBuild step to relink our programs to the 16K pages so that they jump to the correct address.
268// Determine which phase to run
269const args = process.argv.slice(2);
270const phase = args[0] || 'pre';
271
272try {
273    if (phase === 'pre') {
274        preBuild();
275    } else if (phase === 'post') {
276        postBuild();
277    } else {
278        log(`Unknown phase: ${phase}`, 'red');
279        process.exit(1);
280    }
281} catch (error) {
282    log(`\n✗ Build failed!\n`, 'red');
283    process.exit(1);
284}
Finally, we just need to check whether the script is being called during the prebuild or postbuild phase, and execute one block or the other depending on the call origin.
Within the long MSXDOS2 example found in the samples directory, s_dos2.c, there is a section called the driver, which allows loading binaries into memory and calling them. This is similar to what we did in RAM Pagination, where the binary is self-contained and does not use common functions with the main block. However, the compilation method is simpler.
First, the program must be working. In our simple example, driv1.c just returns a value when the function is called. To compile it, we can use the same template used for compiling C files in MSXgl. In our case, we copied it to driv1.js and changed the line:
//-- Overwrite code starting address (number). For example. 0xE0000 for a driver in RAM
ForceCodeAddr = 0xE000;
Once created, it must be loaded into memory and called from the main program. In our case, this is pag_driver.c, and we call it as follows:
res_func1 = CallDriver(0xE000, 5);
Finally, we just need to compile the main program and run it with the emulator.